|
<< Click to Display Table of Contents >> How do I create a Legal Entity |
  
|
|
<< Click to Display Table of Contents >> How do I create a Legal Entity |
|
When starting a new medical practice or reorganizing an existing practice, one of the first things you will need to do is choose a Legal Entity through which the practice will be conducted.
More than one Legal Entity would be used in a multi-office scenario when you want to setup the second office as a separate Legal Entity. A Legal Entity could also be used in case of two or more Providers working together in a shared facility. The data between Legal Entity is shared by the entire Practice. A Practice is created only once, but you can create as many Legal Entities under a Practice as required.
Create a new Legal Entity
1. To create a new Legal Entity, click Setup module and choose Legal Entity, the Practice Legal Entity List will be displayed as shown below.

|
2. Click the add ![]() button, the Legal Entity Information page will be displayed.
button, the Legal Entity Information page will be displayed.
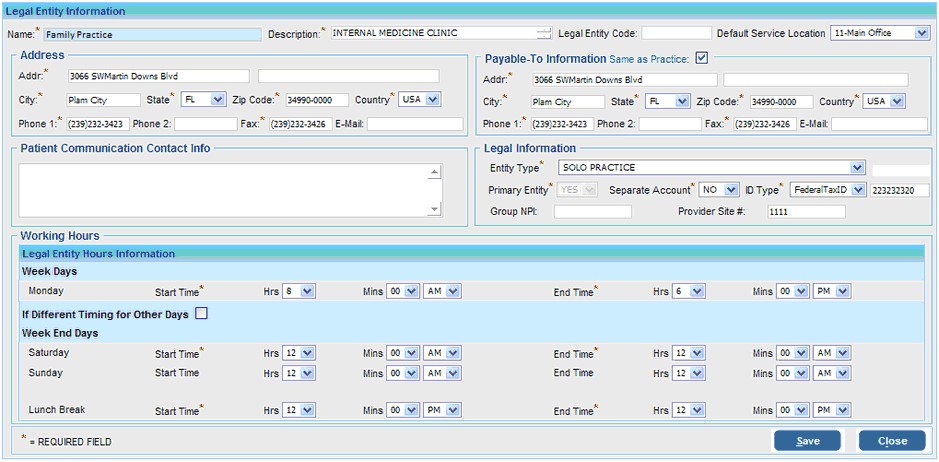
3. Fill in the required details on Legal Entity page as explained below.
Legal Entity Information |
|
Legal Entity Code |
Enter a unique key for the legal entity |
Default Service Location |
Select the Service Location which is to be defaulted in the EMR on selecting the Provider belonging to this Legal Entity |
Payable To Information |
|
a) If the Payable to address and contact details are the same as the Legal Entity address and contact details, click in the Same as Legal Entity check box to automatically update the information. b) If the Payable to address and contact details are different, leave the check box blank and enter the Address, City and Country details. c) Enter the telephone numbers for Phone 1, Phone 2, Fax and also the E-mail address. |
|
Legal Information |
|
a) In the Entity Type box, click on the list b) The Primary Entity Yes/No option allows you to set this option as the Primary Entity if required. c) If this Legal Entity has a sperate account, choose the Separate Account Yes option, otherwise select No. d) You have the option to enter either the SSN or the Federal Tax ID, click on the button in the ID Type box and choose any one and type the ID in the ID box. e) Enter your Group NPI and Provider Site Number. |
|
Working Hours |
|
Week Days |
|
In this area set the practice working hours for regular week days. To set the Working Hours, set the Start Time and End Time options. Click on the list Set both the Start Time and End Time in this manner. |
|
If Different Timing for Other Days |
|
If the timing is different for other days of the week, click in the check box If Different Timing for Other Days and set the time for the other days. (Follow the procedure mentioned in the Week Days area to set the time). If the timing is the same for other days, simply leave this box blank. |
|
Week End Days |
|
Set the timing for Week End days and Lunch Break in this area. a) To set the Working Hours, choose the Start Time and End Time options. Click on the list Set both the Start Time and End Time for Saturday and Sunday in this manner. b) To set the Lunch Break for your practice, choose the Start Time and End Time options. (Follow the procedure mention in step (a)) |
|
4. Select the Save button to save all changes.