|
<< Click to Display Table of Contents >> How do I add Providers |
  
|
|
<< Click to Display Table of Contents >> How do I add Providers |
|
Click on the Setup module and choose Provider, the Provider page will be displayed.
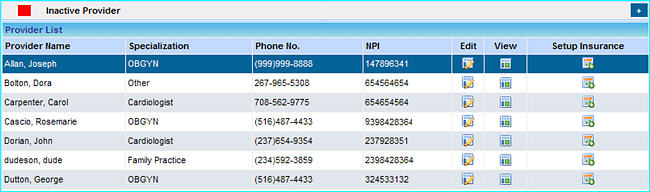
On this page you can perform the following:-
![]() Add a Provider
Add a Provider
![]() Edit Information of an existing Provider
Edit Information of an existing Provider
![]() Edit Insurance details
Edit Insurance details
Add a Provider
1. Click the ![]() button, the Provider Information page will be displayed.
button, the Provider Information page will be displayed.
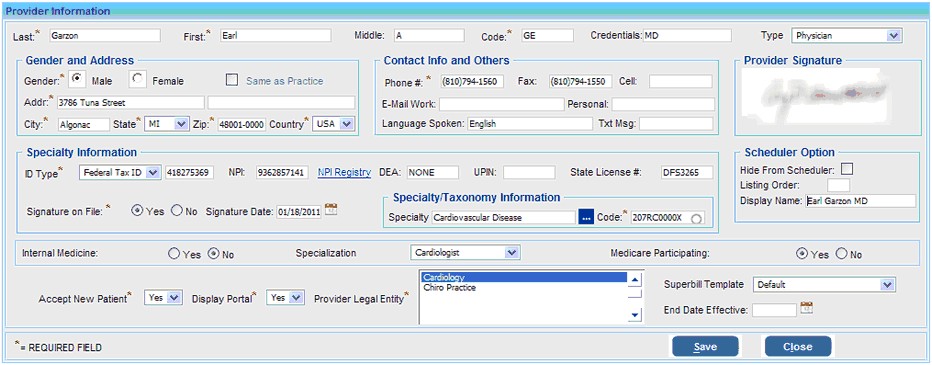
2. Fill in the required details as explained below.
|
Provider Information |
a) Enter the Last Name and First name and Middle name of the Provider in the relevant boxes |
b) A Provider Code is automatically created, if you wish to change this click in the box and enter the new code. |
c) Enter the Provider Credentials in the Credentials Field. |
d) Click in Type of Provider box and select the option which best describes the provider. |
Gender and Address |
Enter Gender, Address, City, State, Zip code and Country Details. |
Select “Same as Practice” check box to copy the practice details like Address, Phone etc to provider master. |
Contact Info and Others |
Enter details like Phone, Fax, E-mail and Language Spoken. |
Provider Signature |
This option is provided to upload the image of the Provider's signature: a) Click on the "No Image" area in the Provider Signature section. b) In the dialog box that appears, click the Browse button and locate the providers signature image on your system and click the Save & Upload button. |
Specialty Information |
a) Click in the ID Type box and choose either Federal Tax Id or SSN, and add the ID and License Number. b) Setting the Signature on File option to Yes will enable the printing of the text "Signature on File" on forms for provides billing electronically. [More on "Signature on File"] c) Enter the State License Number in the corresponding field. d) Enter the National Identifier, UPIN and DEA Number in the respective boxes e) Search for the taxonomy code from the Code field under Taxonomy Information. This will automatically update the Specialty field according to the taxonomy selected. |
Scheduler Option |
a) If the Hide From Scheduler option is selected, this Provider will not be displayed in the Scheduler. Leave this option blank if you want this Provider to be displayed in the Scheduler. b) The Scheduler Listing Order allows you to set the listing of the Provider in the Scheduler. If the Scheduler Listing Order is set to 1, the Provider will be listed first in the Scheduler. Likewise if it is set to 2, the Provider will be listed at the second position. c) Display Name: Enter the name of provider to be displayed in the Scheduler page. |
Choose the main specialization of the provider from the Specialization box. |
If the Provider is a Medicare Participating physician, choose the Yes option. |
Assign the provider to different legal entities by selecting Legal Entities from the Provider Legal Entity text area. |
Click on the NPI Registry link after entering NPI# in the NPI field to view the provider details. |
3. After entering the information , click the Save button. The Provider information will be saved and the Provider will be displayed in the list on Provider page.
4. To edit the information of a Provider, simply click on the Edit ![]() button on the Provider page. Click the Save button after editing the required information to update the information.
button on the Provider page. Click the Save button after editing the required information to update the information.