|
<< Click to Display Table of Contents >> How to Add an Encounter |
  
|
|
<< Click to Display Table of Contents >> How to Add an Encounter |
|
Adding an Encounter for a case which has no previous encounters
If the case has no previous encounters, you have to create a new Encounter from the Encounter area.
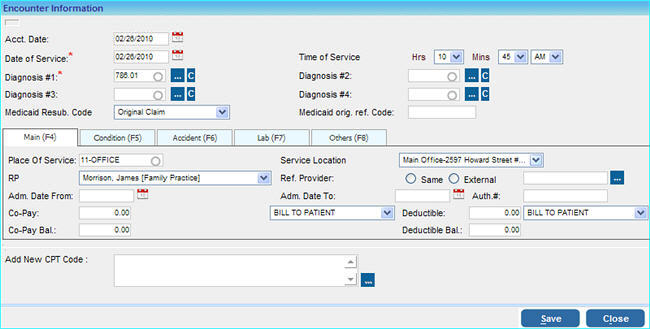
1. Click the Add Encounter button in the Encounter area, the Encounter Information window will be displayed as shown below.
|
2. Enter the following information in this window.
Acct. Date |
Enter the accounting date. |
||||
Date of Service |
Click on the calendar icon |
||||
Time of Service |
Choose the correct time of the encounter from the boxes provided. |
||||
Diagnosis |
This is where the details of the diagnosis of the Patient is entered. You can enter up to four diagnosis for an encounter. 1. Click on the search 2. If you know the diagnosis code, enter it in the Diagnosis Code box and click the Search button. OR Enter the description of the diagnosis in the Diagnosis Description box and click the search button. 3. A list of the diagnosis will be displayed. Select the correct diagnosis from the list. The selected diagnosis will be displayed in the list. |
||||
Medicaid Resub. Code |
Select the correct option from this field to adjust or void a previously paid claim, otherwise leave it as it is. |
||||
Medicaid orig. ref. code |
Enter the Medicaid original reference code. |
||||
Add New CPT Code |
To add new CPT codes for this encounter, click on the add If you know the CPT Code, enter it in the CPT Code box and click the Add button. Else, you can search for a CPT Code in any of the two ways mentioned below.
The list of the CPT codes for the given search criteria wild be displayed. Select the required codes and click the Add button. |
3. Click on the different tabs and enter the relevant information.
Main: |
a) Enter details of Place of Service, Service Location, Rendering Provider, Referring Provider. b) Enter the Admission date from and To. c) Enter the Authorization number if applicable. d) Enter the Co-pay amount, the Co-pay balance (if any) will be displayed in the Co-pay Balance box. e) Enter the Deductible amount if applicable, the Deductible balance (if any) will be displayed in the Deductible balance box.
|
|
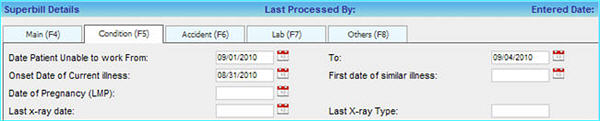
Condition: |
Under this tab details of the condition of the patient like Date Patient Unable to work from, Onset of Current Illness, Date of Pregnancy, Last X-ray date etc if required can be entered.
|
|
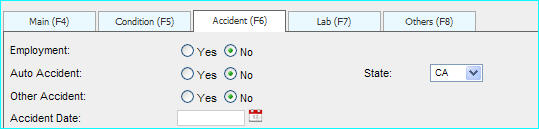
Accident: |
Accident related details if required can be entered under this tab.
|
|
Lab: |
Lab related details like CLIA #, Lab Charges etc can be entered here if required.
|
|
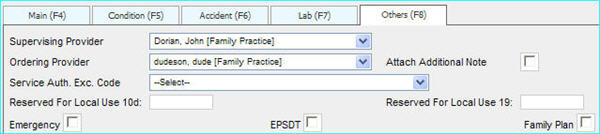
Others: |
Details of Supervising Provider, Ordering Provider, PCP, Service Auth. Exc. Code etc can be entered under this tab if required.
|
4. Click the Save button. The encounter will be saved and displayed in the Encounter Area. The Encounter Lines for this encounter will also be displayed.
Editing an Encounter
You can edit the details of an Encounter using the following buttons provided in the Encounter area
|
This is the Add Encounter button, clicking this button will open the Add Encounter window where you can enter details of any new encounters.
|
|
This is the Edit Encounter button, clicking this button will take you to the Edit Case window where you can edit the required details of the Case
|
|
This is the Add Activity button, clicking this button will open the Add Activity window where you can add any activity notes. For eg. details of any changes that have been made using the Edit Encounter button etc. |
|
This is the View Activity button, clicking this button will open the View Activity window which will display the details of all the entered activities. |