|
<< Click to Display Table of Contents >> Payment Posting |
  
|
|
<< Click to Display Table of Contents >> Payment Posting |
|
1. To open the Payment Posting screen, click on the Billing module and choose Payment Posting. You can also reach this screen directly from Payment Entry by selecting the Apply option.
|

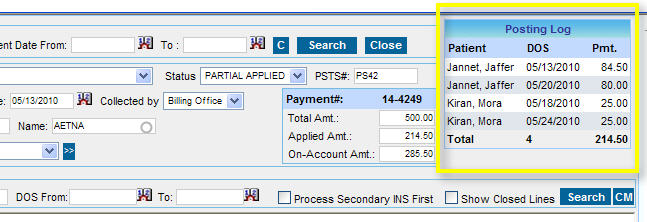
2. To start Payment Posting, you have to select a payment entry first. Select the Search option in the Payment Search area and choose a search criteria i.e either Payment#, PSTS#, Check#, Patient or INS (Insurance). You can also search for payment entries by entering the Payment Date From and To.
3. After selecting a Search criteria, type the search value in the next box. A list will appear with all the matching Payment Entries, select the required Payment Entry from the list.
|
All the details relating to the Payment Entry will immediately be displayed. The Posting Log will display the details of Posting performed for this Payment Entry.
4. To start posting, select a patient first. If you are making a Payment posting for a Copay, the Patient information will also be automatically updated on the screen since the payment entry for the copay collected will be made against the name of the patient. But if the Payment posting is for a claim, you will have to select the name of the Patient for whom you have received the payment from the insurance company.

5. In the Search Encounter Area, enter the patient name in the Patient box or enter the Claim# or DOS (Date of Service) then click the Search button. The details will be displayed line by line as shown in the image. The line details are explained below.
Code |
The charges will be listed against each line with the codes. |
Claim# |
The claim number against which the line has been billed. |
Charge |
This is the original billed charge. |
Rem |
This displays the Remaining charge for the line. |
Allowed |
Enter the Allowed Amount in this box. The Allowed amount will be highlighted in red color if the amount entered is less than the amount specified in the Fee Schedule. |
Paid |
Enter the Paid Amount in this box. |
To Copay |
Enter the Copay amount if any here. |
To Ded |
Enter Deductibles if any here. |
Adj |
Enter the Adjustment amount here. |
Reason |
Select the Adjustment reason from the list. |
With Hold |
Enter the amount to be withheld if any here. |
Balance |
The Balance is automatically calculated and displayed here. |
Next Action |
In the Next Action box, choose the action that has to be taken on the particular line. The Next Action for each line has to be selected before clicking the Post button. The explanation for the Next Action abbreviations are given below.
WO_CLOSE :- WRITE OFF CLOSE PAID_CLOSE :- PAID CLOSE BILL_TO_PT :- BILL TO PATIENT BILL_TO_GR :- BILL TO GUARANTOR RE_BILL_TO_PR :- RE-BILL TO PRIMARY INSURANCE
|
Reverse |
The Reverse option allows you to take back any amount that has been wrongly posted against a line. (i) To take back any amount, click on Reverse (ii) Click on the Reverse button to take back the amount. Click here to view the Reverse screen. |
Notes |
To enter any notes, click on the Notes icon. |
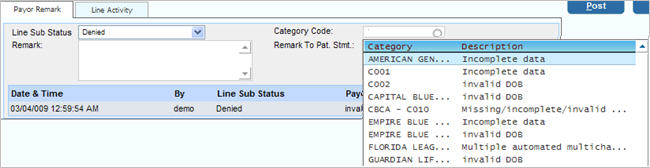
6. When you click on a line, the related Payor Remarks, Line Activity and Other Adjust will be displayed below.
Payor Remark |
You can enter remarks relating to denials etc here. If the line was denied, set the Line Sub Status as Denied and then choose the Category Code. You can also enter remarks here which will appear in the Patient Statement
|
Line Activity |
The Line activity shows all the activities that have been performed on the particular line.
|
Other Adj |
Enter details of other adjustments made here. Choose the Other Adj. Reason and enter the amount in the Other Adj. Amt box. |
7. After entering all the details, click the Post button to complete the payment posting process.