|
<< Click to Display Table of Contents >> How do I create a Custom Fee Schedule? |
  
|
|
<< Click to Display Table of Contents >> How do I create a Custom Fee Schedule? |
|
To create a Custom Fee Schedule,
1. Click on Advanced Setup module from the menu and choose Custom Fee Schedule.
2. In the Search Custom Fee Schedule page that appears, click the add ![]() button. The Custom Fee Schedule screen will appear as shown below.
button. The Custom Fee Schedule screen will appear as shown below.
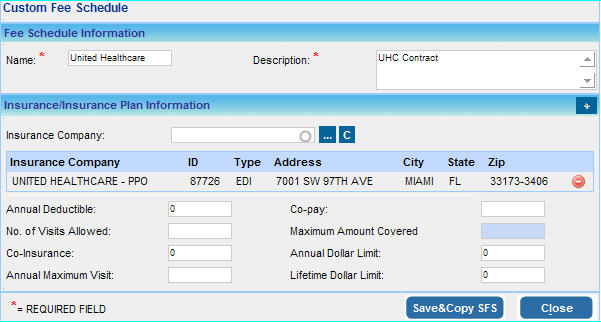
3. Enter a Name and a Description for the Fee Schedule.
4. Click on the search ![]() button or enter first 3 letters of insurance company to choose an Insurance Company to associate with this Fee Schedule from the Insurance Company box.
button or enter first 3 letters of insurance company to choose an Insurance Company to associate with this Fee Schedule from the Insurance Company box.
5. Enter the following information,
Annual Deductible |
Enter the Annual Deductible for this plan. |
Co-Pay |
Enter the Co-Pay Amount for this plan. |
No of Visits Allowed |
Enter the Total Yearly Visits permitted for this plan. |
Maximum Amount Covered |
Enter the Maximum Amount Covered. |
Co-Insurance |
Enter the Co-Insurance amount. |
Annual Dollar Limit |
Enter the Annual Dollar Limit. |
Annual Maximum Visit |
Enter the Annual Maximum Visit. |
Lifetime Dollar Limit |
Enter the Yearly Maximum Payable Amount. |
6. Click the Save & Copy SFS button. The information you entered will be saved and Custom Fee Schedule will be copied and displayed below.

The Fee schedule is editable, You can change the amounts as required. A procedure can also be end dated (i.e. made inactive) by clicking on the date icon and choosing a date.
7. When the required changes have been made as required, click the Save button located at the bottom. This fee schedule will be saved as a Custom Fee Schedule.