|
<< Click to Display Table of Contents >> Creating a Case from the Scheduler |
  
|
|
<< Click to Display Table of Contents >> Creating a Case from the Scheduler |
|
Every appointment requires a case, a patient can have more than one case. The case assignment can be done during the creation of the appointment or prior to billing.
Scenario ![]() A patient Smith Kimberly is coming in today for a visit and we are going to add a new case to her list. Today's visit is going to be identified as an Work injury or illness.
A patient Smith Kimberly is coming in today for a visit and we are going to add a new case to her list. Today's visit is going to be identified as an Work injury or illness.
1.To view the Appointment Scheduler window, click the Scheduler module ,the Appointment Scheduler window will be displayed as shown below.
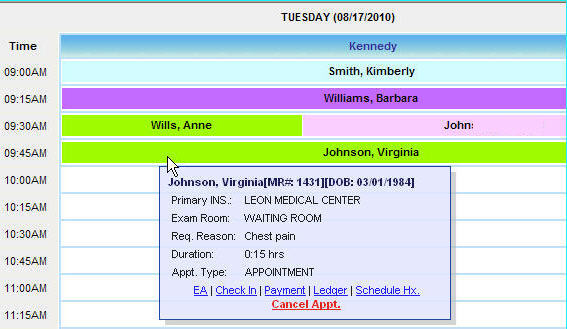
2. Click on the patient's name Smith Kimberly, to open the Patient Information page.
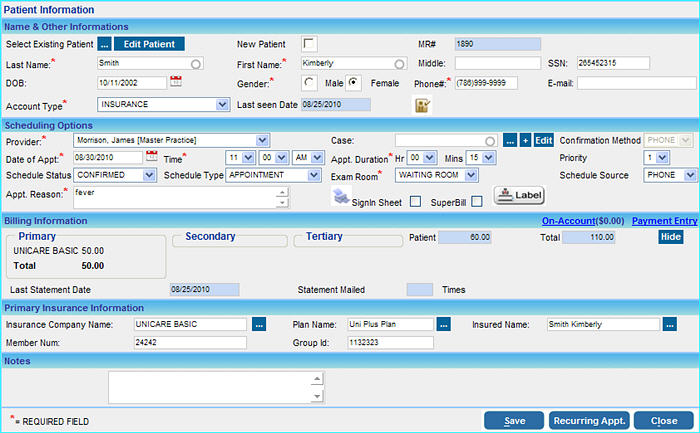
3. Click in the Case box to view a list of the present cases for the patient. Since none of the cases are appropriate for today's visit, we are going to add a new case.
4. Click the ![]() button; the Case window will open as shown below.
button; the Case window will open as shown below.
From here we will work through the different steps for adding a case. The information on the case windows drives what prints on your HCFA and CMS forms. Make sure that all the information is correct and up to date. If the patient is a new patient, you will have to enter information on all the screens before completing this form. so you will have to enter the patient's address and demographic information as well as insurance information to complete this case.
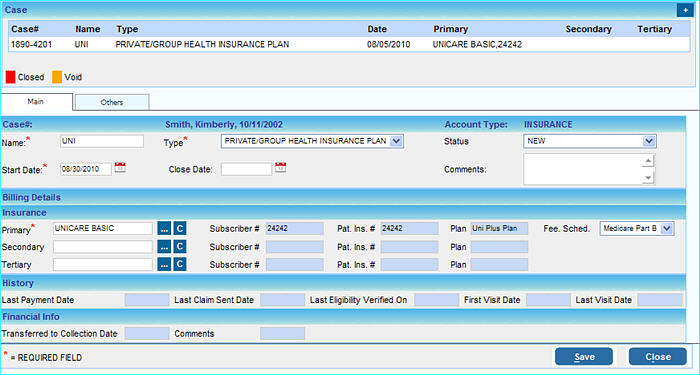
5. The details of the case like Name, Type, Status, Start Date etc are automatically filled in except when the patient has multiple Primary/Secondary/Tertiary insurances. The Name of the case is given for your easy reference, you can change it or opt to keep the system generated name.
6. For patients with multiple insurances, click on the search ![]() button in the Primary/Secondary/Tertiary box for the list of Insurance Companies associated with this patient.
button in the Primary/Secondary/Tertiary box for the list of Insurance Companies associated with this patient.
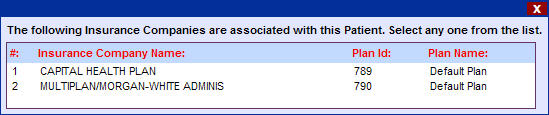
7. Choose the insurance from the list, the insurance details will immediately be updated.
8. If you wish to add additional information related to the case like Accident, Condition, Diagnosis, Authorizations, Associations etc click on the Others tab otherwise to create a case using the basic information, click the Save button.
9. Under the Others tab, enter the following information.
Association |
a) Enter the POS (Place of Service) and the Service Loc (location). b) Select the Rendering Provider and Supervising Physician from the lists provided. If the Referring Physician is from the practice, choose the Same option and click on the search c) Enter the Adm. Date From and Adm. Date To if required. d) You can also enter details of the Employer and Attorney if required. |
Condition |
a) If the patient is unable to work, fill out the Patient Unable to Work From and To dates. b) You can also enter details of the Last X-ray Type and Last X-ray Date. c) If relevant, you can enter the Date of Pregnancy (LMP). d) You can also enter details of the Onset Date of Current Illness and First Date of Similar Illness. |
Accident |
You can enter details related to accidents here like Employment related, Auto Accident, Other Accidents etc. Since this is a work related accident, set the Employment checkbox to Yes. |
Authorization |
Enter details related to Authorizations in this area like Authorization No, Authorization date etc. |
Diagnosis |
If required, you can add diagnosis for a case, click in the D1 box and search for E880.3 Accidental Fall on Stairs (@ Industrial Place) and select it. You have the option when entering charges to select either the working diagnosis of the case or to enter a new diagnosis. You have the option to choose up to four diagnosis from this screen. Click the Next button after entering all the required information. |
10. Click Save button to create a case, the case will be displayed in the list .