|
<< Click to Display Table of Contents >> How to add Patients |
  
|
|
<< Click to Display Table of Contents >> How to add Patients |
|
1. To add a new patient, click on the Patients module, the Patient Search page will be displayed as shown below.

2. Click on the ![]() button to open Patient Information page.
button to open Patient Information page.
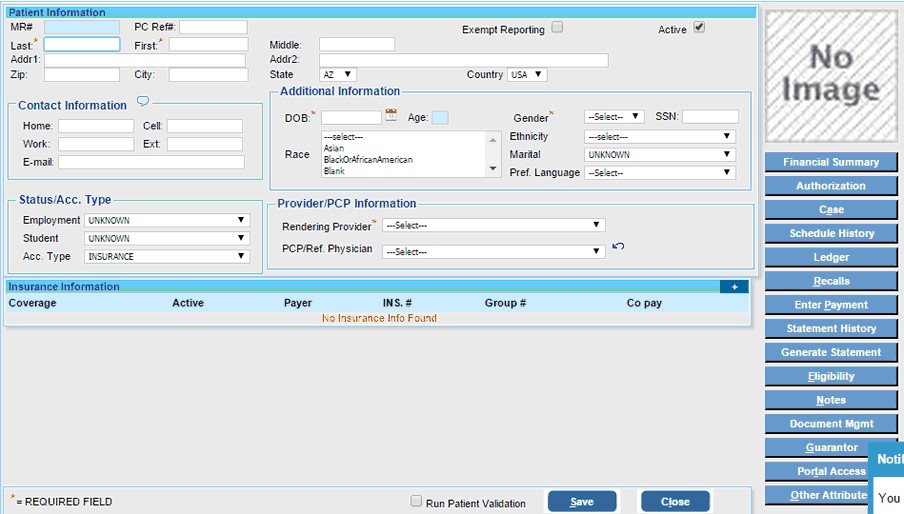
3. Enter the relevant information as shown in the table below.
|
|
a) Enter the Last Name and First name and Middle name of the new Patient in the relevant boxes. b) Enter the address in the Addr1/Addr2 boxes. c) Enter the Zip Code; the City, State and Country details will be updated automatically. |
Contact Information |
a) Enter the Home and Cell numbers, Work phone and Ext. b) Enter a valid E-mail in the box provided. |
Additional Information |
a) Enter the DOB (Date of Birth) of the patient and choose the Gender Male/Female. b) Enter the SSN of the patient. c) Click in the Marital box and choose the marital status of the patient. d) Click in the Pref. Language box and choose the Language from the list. e) Similarly choose the Race and Ethnicity from the respective boxes. (This information is not compulsory.) |
Status/Acc. Type |
a) Click in the Employment box and choose the employment status from the list. Similarly choose the Student status from the list if required. b) Click in the ACC Type box and choose the account type from the list. |
Provider/PCP Information |
a) Click in the Rendering Provider box and choose the name of the Rendering provider from the list. The Rendering Provider will automatically be added as the PCP/Ref. Physician in the box below. b) If the PCP/Referring Physician is different but is from the same practice, click in the box to list all the providers and choose the PCP/Referring Physician from the list. c) If the PCP/Referring Physician is not in the list, click on the button
c) Click on the search
d) Click on the required provider from the list. The providers name will be displayed in the PCP/Ref. Physician box.
e) If the provider does not appear in the list, you will have to add the provider. Click on the
|
4. After entering all the necessary information, click the Save button.

